|
|
Post by Janglers on May 16, 2007 10:31:49 GMT
I planted up the first lot of my pots yesterday. As I was doing the usual fuchsias with petunias and trailing lobelia, pots full of one type of plant, balls of bizzie lizzies etc., I was wondering what combinations you use?
|
|
|
|
Post by Shuggie on May 16, 2007 14:34:38 GMT
Take two hemispherical wire hanging baskets; plant a young (i.e. not too woody) clematis in each; put some moss over the top of each basket to keep the soil from falling out; wire the baskets together into a "ball" - leaving enough space for each clematis to protrude through the gap between the baskets - and wind the clematis tendrils round the basket (fixing with wire where necessary); hang up the "ball" like a normal hanging basket; keep winding the tendrils round the "ball" as they grow.
It makes an impressive show - but does make you look a bit of a smart@rse!
|
|
|
|
Post by Tina Biscuit on May 16, 2007 18:56:30 GMT
Pretty much whatever I happen to have grown at the time - this is last year's effort  |
|
|
|
Post by Ava Bike on May 16, 2007 20:24:21 GMT
I planted up the first lot of my pots yesterday. As I was doing the usual fuchsias with petunias and trailing lobelia, pots full of one type of plant, balls of bizzie lizzies etc., I was wondering what combinations you use? Try something different Jan - like I have. I've done veggies, mixed with a few other things, like sweet peas and nasturiums (see 'Compamion Planting' thread. Ava xxx |
|
|
|
Post by smiffy on May 17, 2007 4:31:42 GMT
Take two hemispherical wire hanging baskets; plant a young (i.e. not too woody) clematis in each; put some moss over the top of each basket to keep the soil from falling out; wire the baskets together into a "ball" - leaving enough space for each clematis to protrude through the gap between the baskets - and wind the clematis tendrils round the basket (fixing with wire where necessary); hang up the "ball" like a normal hanging basket; keep winding the tendrils round the "ball" as they grow. It makes an impressive show - but does make you look a bit of a smart@rse! In a similar vein, I have seen a basket ball made with succulents. I will try and find the instructions. I know I have them somewhere! I will be back! |
|
|
|
Post by revmichael on May 17, 2007 6:53:12 GMT
Pretty much whatever I happen to have grown at the time - this is last year's effort Nice picture Bobcat. Are they all annuals? Have you thought of growing some perennials, especially those that give a variety of winter foliage - different shapes, textures and colours. It's amazing how many different colour greens there are. |
|
|
|
Post by Shuggie on May 17, 2007 11:02:14 GMT
Take two hemispherical wire hanging baskets; plant a young (i.e. not too woody) clematis in each; put some moss over the top of each basket to keep the soil from falling out; wire the baskets together into a "ball" - leaving enough space for each clematis to protrude through the gap between the baskets - and wind the clematis tendrils round the basket (fixing with wire where necessary); hang up the "ball" like a normal hanging basket; keep winding the tendrils round the "ball" as they grow. It makes an impressive show - but does make you look a bit of a smart@rse! In a similar vein, I have seen a basket ball made with succulents. I will try and find the instructions. I know I have them somewhere! I will be back! *still waiting patiently* *drums fingers* *looks at watch* |
|
|
|
Post by Tina Biscuit on May 17, 2007 11:14:12 GMT
Nice picture Bobcat. Are they all annuals? Have you thought of growing some perennials, especially those that give a variety of winter foliage - different shapes, textures and colours. It's amazing how many different colour greens there are. Actually they're not all annuals - for a start there's a couple of rose bushes somewhere in the middle of that lot, and the gazania in the bottom right of the picture has been with me for several years now. Most of the perennials and shrubs are over the other side of the garden, and the veggies are tucked away in a different corner - but they obviously didn't look as interesting when I was wandering round the garden with a camera last year! |
|
|
|
Post by Janglers on May 17, 2007 12:20:50 GMT
In a similar vein, I have seen a basket ball made with succulents. I will try and find the instructions. I know I have them somewhere! I will be back! *still waiting patiently* *drums fingers* *looks at watch* I have seen this somewheere for house leeks, sampswotsernames! I think it was done the same way you told me about your clematis. Looked dead brill. |
|
|
|
Post by ivy noidea on May 17, 2007 12:45:43 GMT
I have seen this somewheere for house leeks, sampswotsernames! sempervivens? |
|
|
|
Post by carlott on May 17, 2007 13:24:40 GMT
I have seen this somewheere for house leeks, sampswotsernames! sempervivens? Close Sempervivums |
|
|
|
Post by Shuggie on May 17, 2007 13:33:28 GMT
Is there an echo in this shed? |
|
|
|
Post by smiffy on May 18, 2007 6:43:28 GMT
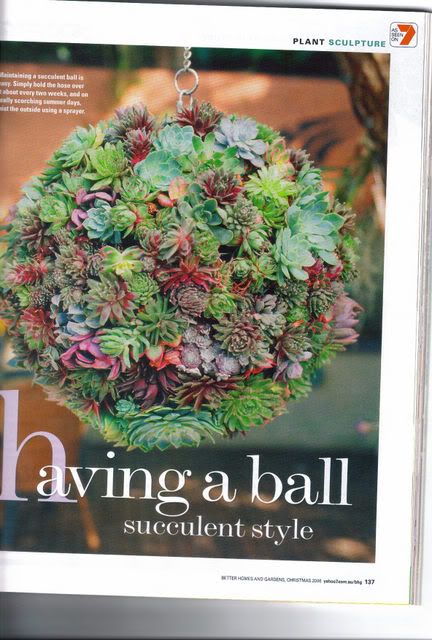 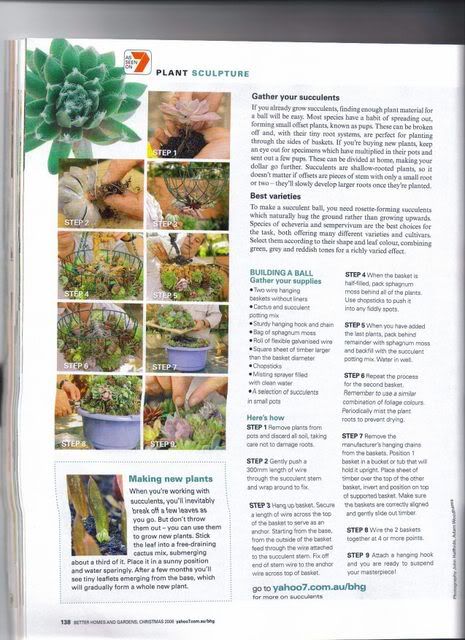 The second pic is for reference only! I know you cant read the distructions instructions so: Supplies; 2 wire baskets without liners, cactus and succulent potting mix, sturdy hanging hook and chain, bag of spagnum moss, roll of flexible galvanised wire, square sheet of timber larger than the basket diameter, chopsticks, mist sprayer filled with clean water, selection of succulents in small pots. How to;1. Remove plants from pots discard all soil, take care not to damage roots,. 2. Gently push a 300mm length if wire through succulent stem and wrap around to fix. 3. Hang up basket. secure a length of wire accross the top of the basket to serve as an anchor. Starting from the base, from the putside of the basket feed through the wire attetched to the succulent stem. Fix off end of wire to the anchor wire accross the top of the basket. 4. When the basket is half filled, pack spagnum moss behind all the plants. use chopsticks to push it into any fiddly spots. 5. When you have added the last of the plants, pack behind remainder with spagnum moss and backfill with the succulent potting mix. Water in well. 6. Repeat the process for the second basket. Remember to use similar combination of foilage colours. Periodically mist the roots to prevent them from drying out. 7. Remove the manufacturers hanging chains from the baskets. Position 1 basket in a tub or bucket that will hild it upright. Palce a sheet of timber over the top of the other basket, invert and position on top of the supported basket. make sure the baskets a re correctly alligned and gently slide out the timber. 8. Wire the 2 baskets together at 4 or more points. 9. Attatch a hanging hook and you are ready to suspend your master piece! The article reccomends rosette forming succulents, such as echeveria and sempervivum. Better Homes and Gardens Chrismas 2006 issueThere! I want to see pics if you make one! |
|


 The Tog Cat in the Hat

